Categories
Growth Academy

Digital Ads: Powerful Internet Billboards

The Role of Visual Ads in E-Commerce Advertising

Digital marketing is arguably defined by the ability to use multimedia (text, photos, videos) in combination to promote your product.  When they say “a picture is worth a thousand words,” here are some stats to back that up:

  • Visual content is processed by the brain 60,000 times faster than text
  • Visual stimuli makes up 90% of all info transmitted daily

If you want to make an impact on your customer, improving your visual ads could be the key to increasing sales on Shopify!  This post reviews the importance of visual ads in ecommerce, as well as how to deploy ad visuals while trying to increase sales on Shopify.

Importance of Digital Ad Design

In the past 10 years, users online have gotten used to bombardments of visual ads across the web, as well as mobile apps.  It’s commonplace to be reading a news article, then suddenly see a visual ad banner for footwear or something completely unrelated to the article itself. 

That’s the first key reason digital ad design is crucial to increasing sales on Shopify – you want your visual ad to be so eye-catching it literally draws the user away from what they were doing and toward your site!  If the visual looks cheesy or unprofessional, users may be wary that the product offered is a scam or low-quality.  Your digital ad design quality needs to match your product quality to boost your Shopify sales.

Digital Ad Design Aesthetics – The Key to Increasing Sales on Shopify

If you notice, major brands like Nike or Apple have perfected the art of making sleek, beautiful, simple ads that showcase their products with vibrant colors and dynamic patterns.  Some of the best ad visuals are basically a beautiful digital canvas with the flagship product in the middle, and a simple slogan like, “Get Ready,” or something that simple. 
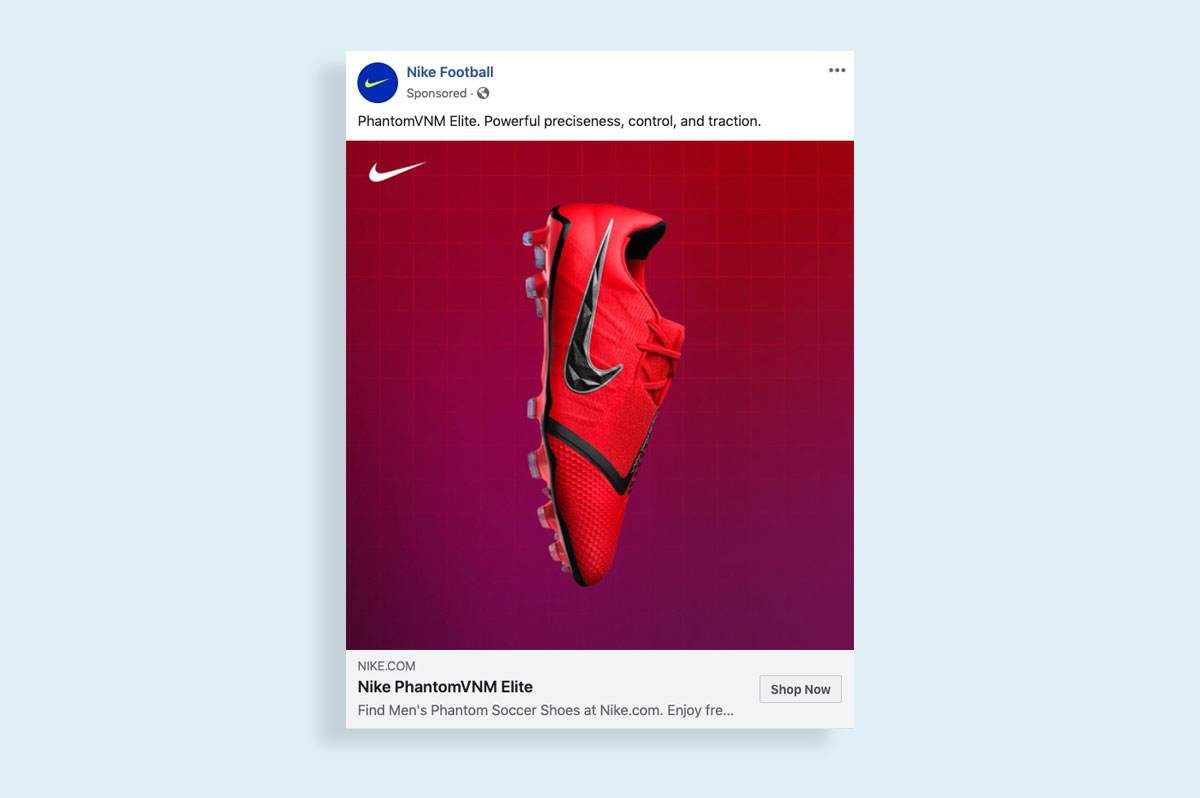
How to Create a Facebook Ad Using Stunning Visuals
Note the beautiful hue in the background and the simplicity of the design – the product centered with the logo in the top-left corner.

High-resolution photos, edited to enrich the color scheme, may immediately draw the user’s eye.  Additionally, putting your brand logo in the middle of a beautiful colored background may enhance their perception of your product line.  To increase sales on Shopify, you need to demonstrate that your digital ads compete with the sleek professional designs found across the web.

Keys to Digital Ad Design Success

To successfully increase your Shopify sales, Ad360 has provided a few key pointers to follow when deciding on your final ad design:

1. Use high-resolution photos of stock photos, models, or your product centered on the ad visual

2. Pick colors that complement each other

3. Use big colorful fonts for a short, eye-catching message (e.g. ’50$ OFF!’)

4. Put your product or brand logo behind beautiful yet simple colored backgrounds with bright or neutral hues

5. DO NOT CROWD THE VISUAL OR OVERCOMPLICATE.  ONE PRODUCT, ONE IMAGE!  Only use multiple images if you have a specific design model in mind

6. Gifs and videos work too, but make sure the thumbnail is as aesthetically pleasing as a still visual

Ad360 Can Automatically Generate Eye-Catching Visuals for Your Business

A recent survey found that a majority of e-commerce business owners would prefer automatically-generated ad visuals and designs: it would save them precious time to focus on day-to-day operations.  Thus, it could be argued that automating your ad visuals is a keystone to increasing sales on Shopify.

If you want to try automating your ad visuals, try a free demo by Ad360 today!  On top of a centralized dashboard for all ad campaigns, as well as making ad campaign creation as simple as one click, Ad360 automatically extracts data from your Shopify store to create ad visuals.  From there, you will have multiple options of which one to release across the web, drawing in more visitors and increasing your sales on Shopify 😊

Categories
Growth Academy

Frank’s story pt4: how to easily get visuals

If you’ve been following the “Odyssey of Frank’s Shopify Store” with Ad360, you know Frank went from a dated brick-and-mortar salesman to selling online during the pandemic. 

He could even implement savant geolocation targeting and other advanced advertising features thanks to Ad360. His ads no longer went unnoticed in Google and Facebook. 

Moreover, he now had access to millions of websites and mobile apps to advertise on.

However, there is a final promotional piece to the puzzle missing here…

Frank and many Shopify store owners getting started with digital advertising face this roadblock.

Sleek, professional, truly eye-catching ad banners.

Who generates them?

Frank read online that most Shopify store owners in his position relied on some third-party app, no matter what they approach. Some downloaded Canva online to paste together a basic ad (which they had to remake over and over), while others hired an Adobe pro illustrator… for hundreds of dollars per banner. Oof.

Frank majored in business management – not graphic design… 

Yet, here, he felt the success of his Shopify store depended on having a variety of ad banners to deploy across the web. Being a one-man-show, Frank already handled all the daily responsibilities of keeping his Shopify store running and his social media at a “base engagement” level. Adding on the burden of pumping out creative ad banners gave the guy a headache. He made one while rushing, and within 30 minutes, his buddy reached out: “Dude, you know that Shopify store ad you just posted on Instagram? It’s off-center dude. It looks like you were drunk when you made it. Just a head’s up.”

Before slamming his head on the desk in frustration, Frank reached out to Ad360’s 24/7 support. They reminded him their software has one of the most powerful creative generator tools in the industry…

Ad360’s creative ad banner feature generates 15 distinct ads of different shapes, colors, and sizes. Even better, the pictures and pricing were automatically extracted from his Shopify store data.  

The guy didn’t have to lift a finger – all these creative, professional-standard ads generated instantly from Ad360’s suite of features.

Frank no longer felt “washed out” or limited testing different Shopify store ads on the web. Some were designed for “above-the-fold” viewing, some for “below-the-fold” placements, and others for almost any ad inventory shape you can think of. 

Even better, Frank found it super simple to keep track of which of these ads performed the best – Ad360 kept that data organized on his Shopify store dashboard. Plus, Ad36 automatically focused on the ads bringing the most visitors and buyers to Frank’s website.

Are you spending hours creating your own ads, only to throw them up and get a less-than-stellar return on ad spending (ROAS)? Please reach out, and try our free demo of Ad360 today for access to our “instantaneous ad generation tool.”  

Never again will you waste your precious hours centering a single ad on Canva or Adobe: you’ll get 15 original designs with the snap of a finger.

All powered by Ad360’s suite of services – try our free demo today to see if it can boost your sales and change your life!

Categories
Features Highlights

How to create a Line Item?

A step-by-step guide to starting a line item from scratch in Ad360 App for Shopify

A Line Item contains settings allowing Ad360 to know which audiences to target (e.g. focusing on specific geolocations) and which creative asset to show them.

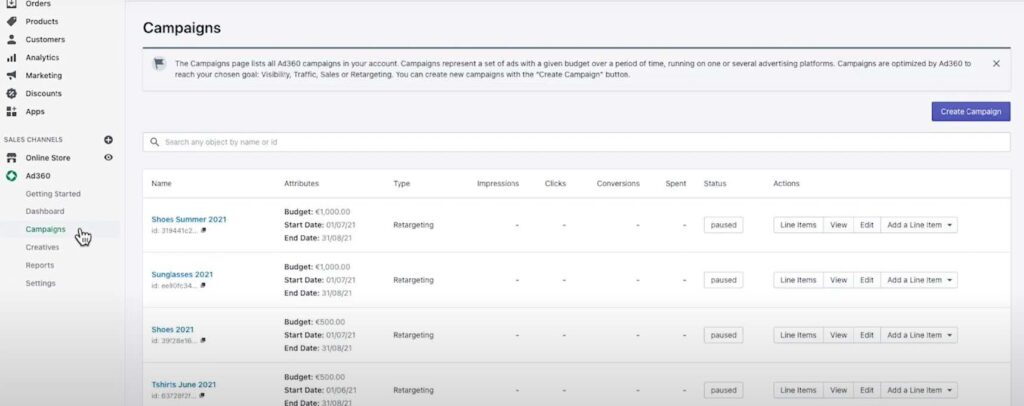
1. Select your Campaign

Firstly, you need to select the Campaign under which you want the line item to be created. To do this, go to the campaign section and you will see a list of your campaigns.


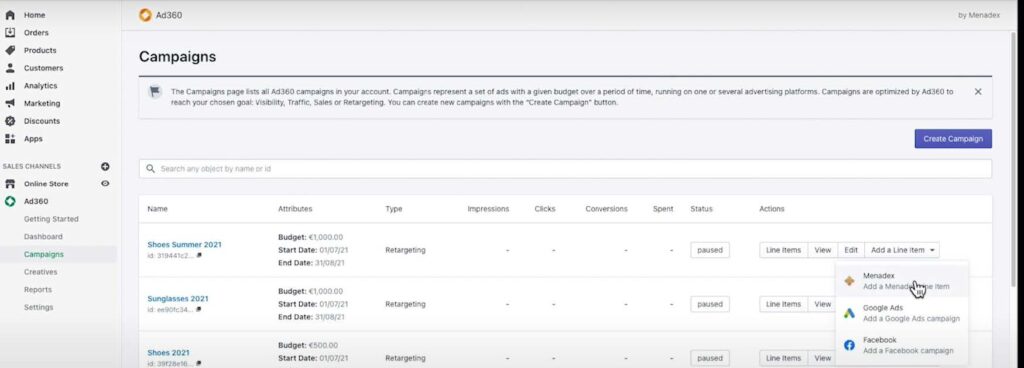
2. Add Line Item

You can add a line item from the campaign page, or directly from the “Add a Line Item” button.


3. Select a Line Item type

If you click the “Add a Line Item” button you are given the following options: Menadex, Google Ads or Facebook.


Google Ads and Facebook allow you to import into Ad360 advertising campaigns even if they run on the Google Ads or Facebook platforms, so that you can manage all your ads in one place.

Menadex is our own media offering, enabling your ads to run on millions of independent websites and mobile apps. More details below:

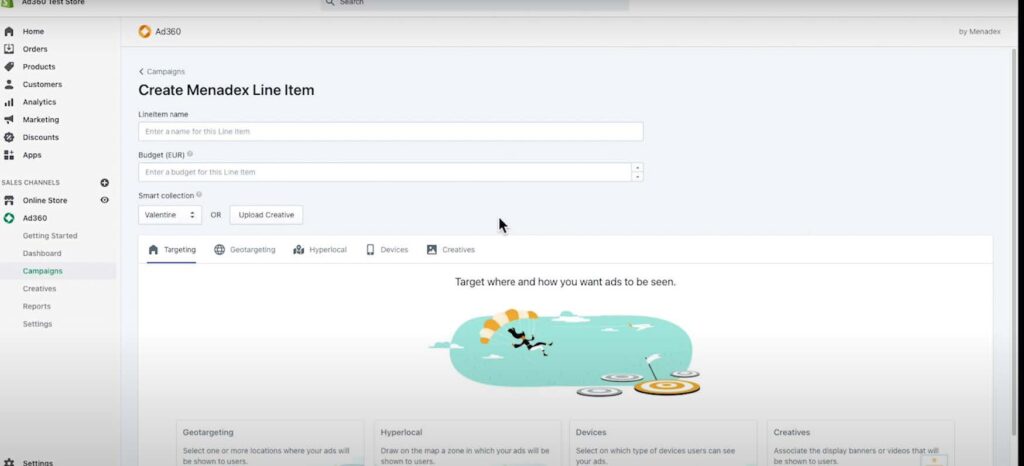
Menadex line item option.

When you have clicked onto the “Menadex” option, you will be redirected to the Menadex line item creation page. Here you can add the name for your line item and enter a specific budget.

● You can choose a “Smart Collection” from your store to use for the line item.

4. Choose an Option For Targeting

This determines where, and how many ads are going to be seen by users on theweb.

The different tabs can be accessed by clicking on the cards.

5. Option: Geotargeting

Geotargeting allows you to select specific places where your ads will be seen:

● You can select an entire country for example: the United Kingdom.

● You can also select specific cities for example: Berlin, Germany and Paris, France.

● Additionally, you can choose specific types of places, such as an airport, for example: JFK Airport. You can add as many places and types of places as you require for your ad to be displayed to web users.

6. Option: Hyperlocal Tab

Secondly, you can add an area in the Hyperlocal tab, this will allow you to draw a specific zone on the map for your ad to be seen.

For example: San Francisco, over the Pacific Heights neighbourhood. – Your ads will only be seen in this area, and in the locations, you have selected in the Geotargeting tab.

7. Option: Devices

In Devices you can even select which devices your ad will be displayed on, by default, all devices are selected, however you can select only one or two if you prefer.

The options are: Desktop, Mobile, Tablet.

8. Option: Creatives

Finally, you can decide which ad banners or videos to show users: if you have creatives, you can upload them by using the “Upload Creative” button.

You can add standard banner display creatives, as per the IAB (Internet Advertising Bureau) specifications.

Choose a size in the list which matches your creative, or a video in one of the given aspect ratios.

If you already have creatives uploaded, you can associate them from your library, and you can link using the “Associate Creatives” button.

If you do not have any creative assets, don’t worry because you can create these in the Creatives Studio.

Categories
Growth Academy

How to use the Creative Studio?

A step-by-step guide to using the Creative Studio to immediately get creatives from scratch in Ad360 App for Shopify.

1. Go the Creatives. tab

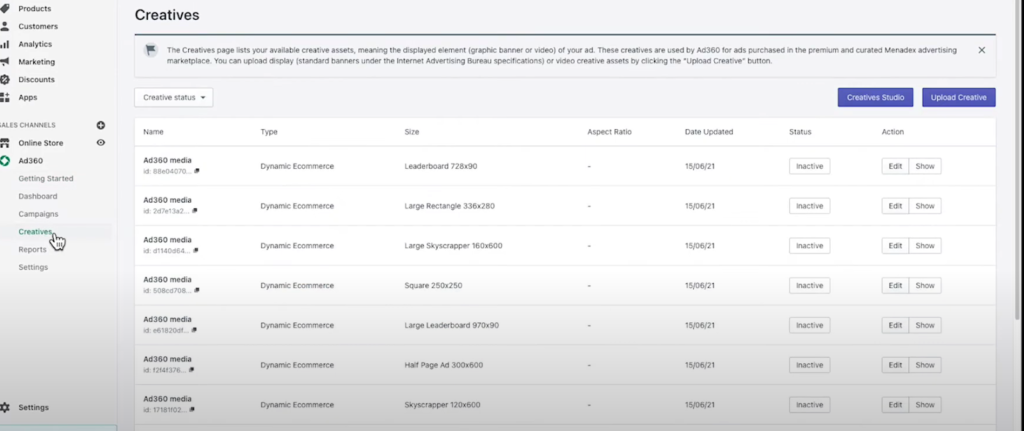
Firstly, click on the “Creatives” link on the navigation panel to go to the Creatives page. There, click on the “Creative Studio” button to access the Creatives Studio.


2. Creative Studio Page.

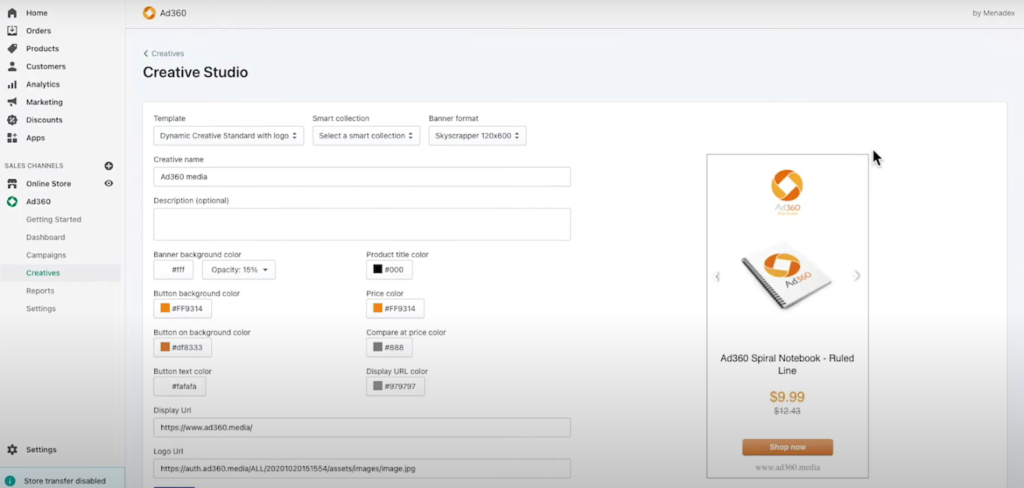
On this page, you will see banners that are automatically generated by Ad360, based on your product information in your Shopify store. You can choose a Shopify collection of products so that multiple products are automatically included in the dynamic banner.

  • They will include: a product image, the product title, price and comparaison price (if you have a sale on the item in your store).
  • You will have banners created in multiple formats and sizes. If you select the template you prefer, all the formats in the template will automatically be saved when you click the “create” button at the bottom of the screen.
  • The banners are dynamic, meaning that if you change a product’s name, image or price, the advertising banners will automatically be updated. Plus the banner feature multiple products and will show the right one to each user based on their interest to maximize the sales opportunities.

3. Personalize your Banners.

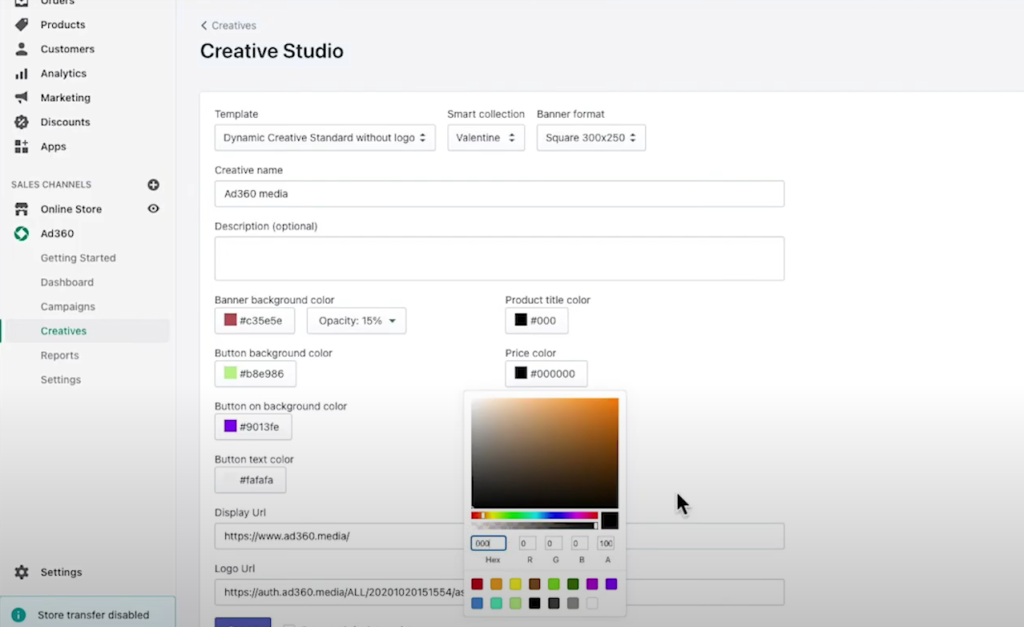
After choosing a product collection, you choose the template (e.g. with or without logo), and multiple sizes are automatically generated with your products info.

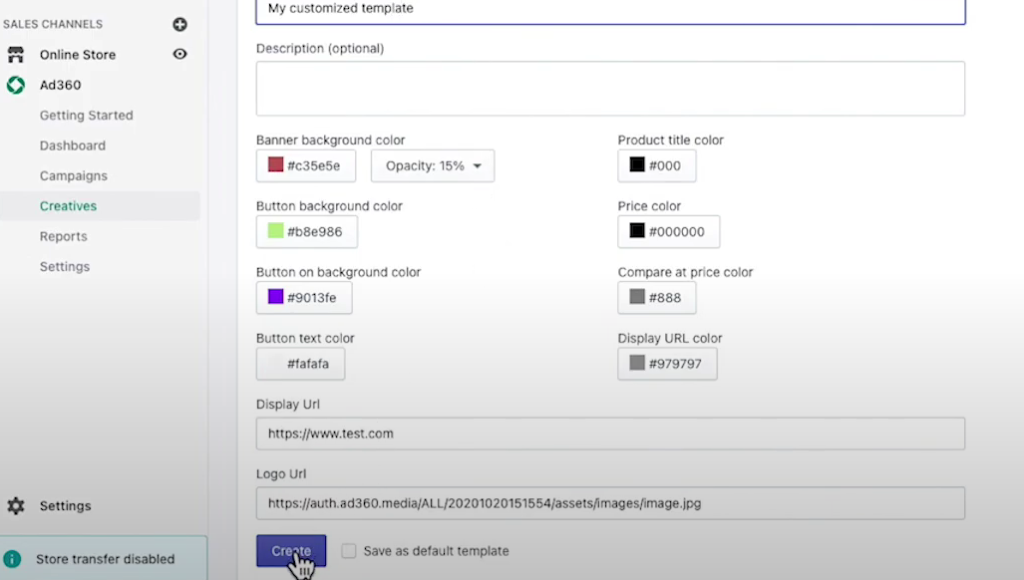
You can customize background and text colors using the buttons in the middle of the screen.

  • You can change the display URL in the text box, which is shown at the bottom of your creative.
  •  This will not affect where the users go when they click on your product, they will still be automatically redirected to the product page within your shop, but it will simply display your website address on the creative.
  • Finally, you can change the logo address which will be used for the templates containing a logo.

4. Save your template.

Click the “Create” button to save the templates and all formats at once. All sizes will be added to your Creatives library and can be easily added to any of your Line Items.